Tuesday, November 27, 2012

The First Coat....

Yesterday was a busy day. We cleaned all the floors with a vacuum and tack-cloth, then Michael used his sheepskin mop to apply the first coat of urethane on the rest of the floors throughout the cottage. We will sand this coat tonight and then apply the second coat early tomorrow morning.  I was only able to poke my head in the doors to get some photos.

This is a shot of the living room. That spot on the floor in front of the fireplace, has been left open so we can install the stones I have collected, thus creating a flat hearth. The rest of the wall around the fireplace will also be covered with stone. 

            Here is the the hall and a bit of the kitchen. (Those cupboards still have to be painted.)

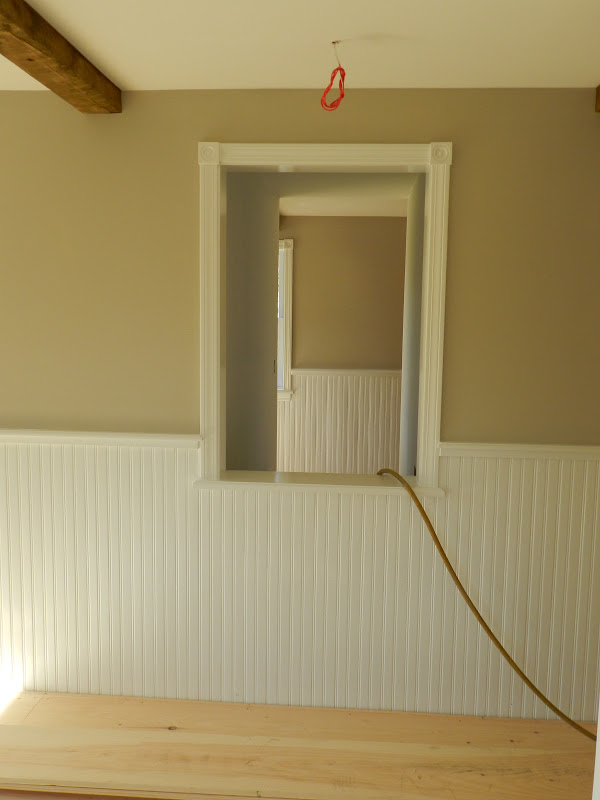
                                                  Here is part of the entryway into the kitchen.

                                              Here is the hall leading to the living room.

Yesterday I also got a cord of wood delivered, which had to be stacked before we started the floors. After this initial load of wood, I will never have to buy wood again because all the wood I have on the property will be cut and seasoned each year.

The duct work you see on the lawn is everything I uninstalled and pulled out of the basement the other day. The old furnace and oil tank are next to be removed.


On Sunday I took a morning hike up a nearby mountain with other nature enthusiasts and history buffs. Our guide, Rosey Gerry told us the story of the ill-fated Millerites, who climbed this same trail on October 22, 1844 to meet Jesus at the top. Because they believed the world was ending, they gave up their farms, their families and their friends, only to discover that they were wrong. 
They suffered great humiliation and poverty afterward.
  

                    We also investigated cellar holes and abandoned homesteads along the way.

                 The views of course were spectacular. Here is Lake Megunticook in the distance.


Monday, November 26, 2012

Floors Continued...

So the floors are all stained now. Today we'll apply the urethane and then it's "move-in" time! 
We will work on the electric and baseboards after I move in.
What do you think of the floors?

The living room...


 The hallway...

The bathroom...

The kitchen....


                                                                       The entryway...

            I'll be sure to post photos of the finished floors in the next few days.

Saturday, November 24, 2012

The Floors

I hope everyone had a lovely Thanksgiving. Here in Maine it was more like Easter weather than the usual chilly Thanksgiving days we've experienced in the past. I flung open the doors and turned off the heat while I cooked the turkey and trimmings. I even sat on the balcony for a while and read my book in the sun. What a delightful day.

The two days before Thanksgiving we coated the bedroom floor with stain and two coats of urethane.

After installing the pine flooring, Michael got down on his knees and sanded all the floors with a hand sander. He did not want to rent an upright floor sander because he felt it would be too harsh on the bare, soft pine. He also felt that the rooms were small enough to sand by hand. It was a lot of work, but well worth it.


After the bedroom floor was sanded, the two of us stained the floor. I started from one end and Michael started from the other, meeting in the middle. I scooted out to take the picture.


                    Here is what it looked like completely stained. This bedroom measures 12' x 24'.

Once the stain dried, I applied the first coat of polyurethane with a brush, and then let that dry. The day before Thanksgiving, Michael's son Matt and I sanded the first coat, cleaned it, and then Michael applied a second coat of high gloss urethane with a special sheepskin mop. The results were spectacular.


We chose to go with a high gloss finish because we wanted a very durable surface, especially when using soft pine flooring, and we liked the idea of reflected light. The floors will wear better and look older, which is exactly what we wanted.


   Once the rest of the cottage floors are finished, we can start on the baseboards and the electrical
   outlets. All that will all happen this week. Fingers crossed!

                                                             Have a terrific weekend.


Wednesday, November 21, 2012

Thanksgiving Day!

I wish you all a 
Happy, Healthy and Joyous Thanksgiving!


                                 I am so thankful for your continued support and encouragement.

Sending you lots of love,

Carole

Sunday, November 18, 2012

The Blue Lamp

work on Catch Meadow Cottage is progressing very nicely. Michael had to start a full-time building project back in Friendship again, so he is only able to work at the Cottage on weekends or rainy days. Consequently, the work has slowed down a little, but not too badly. I have been sanding and painting every day for the last two weeks. 

I wanted to share with you some photos of the progress, but first I thought you might like to see what I bought yesterday at a rummage sale. Stuffed under one of the tables at the sale, I noticed a cardboard box and in the box I saw a bit of blue glass sticking out. When I moved aside some of the bubble wrap, I spied the most beautiful hanging lamp! Made of solid brass, this stunning lamp looked to be well over 100 years old. The cloth covered wiring testifies to that. I am sure it came out of a lovely old home somewhere in Maine. I snatched up the box and asked one of the ladies how much the lamp was. "$15.00" was the reply and I immediately said, "I'll take it!"
It will look gorgeous hanging in the front entry of the cottage. Just look at the intricate detail in the brass. The thick blue glass has milky veins running through it and is undoubtedly original to the lamp.


 The new fridge and dishwasher arrived last week. I stained and polyurethaned the floor beneath, before we set the appliances on top (after it dried of course). We will continue with the rest of the floors this week. All the plumbing was finished up yesterday, so I now have running water and a toilet! In this photo you can see the new appliances. The metal island is not staying in the kitchen. I have just been using it as a temporary work station. An old table I have been saving to use as an island, will go there instead. All the cupboards still have to be painted but Michael is going to do that because we are using a special epoxy-marine paint and he is more familiar with using it than I am.


         Yay! the toilet is in...no more buckets! In this photo you can see that I stained and polyurethaned
                    the floor so the toilet could be set. This is the stain color we will use on all the floors.


  I painted the doors in the bedroom too. Michael still has to set one more rosette above the closet door.

         Here is the door leading to the bedroom. Rosettes still have to be added above this door as well.
                                                 The door on the right leads to the bathroom.


                                    Michael polyurethaned the bedroom closet floor to test the color.
                             The slant in the background will be veneered and used as a shoe rack.


Have a beautiful Sunday! 
I'll be painting away but I must take a walk in the meadow first, as it is a NO hunting day today and I want to take full advantage.

Sunday, November 11, 2012

So Much Done In A Day!

We really pushed it yesterday. Wherever Michael was installing wainscoting or trim, I was right behind him with a paintbrush and a can of primer!

As you can see, I painted the wainscoting which he installed the day before. This runs from the kitchen to the front entry. He also installed the piece next to the door and all the trim around the front closet. The two lower cupboards in the foreground also have wainscoting applied to each side of them. 


The front entry is all primed now. The closet doors will be installed after the floors are done. 
This is a good picture to see the different widths of pine boards we used for the flooring. 


Here in the distance, you can see the wainscoting on the end panel of the lower cupboard.
On the left of the photo is the new staircase leading down to the basement.


 This photo looks like it's a mirror image but actually this is a shot looking from the living room through the window and into the front entry. As I mentioned in the last post, this window was once the cellar doorway but after turning the stairs around, we created an interior window to let more light into the stairway and to better circulate heat. An unforeseen added plus is that it makes this little cottage seem much bigger.


Here is the living room seen from the kitchen. I are still collecting flat stones from the property to install around the fireplace but my efforts have been thwarted by hunting season. Now I only have Sunday's to look for rocks. (Sunday's are the only days, through the month of November, that hunting is not allowed)


Although this photo doesn't portray it very well, the new paint in the bathroom looks much brighter and helps to make the room seem bigger. This photo was taken after dark but I assure you, it will be light and lovely when completed. I repainted the entire space yesterday because the first color I had chosen 
was far too dark.  


This is a view of the side of the panty in the kitchen. Instead of leaving it blank, I thought it would be fun to have a chalkboard in the kitchen. I asked Michael to make some trim to go around it and I painted the top half with blackboard paint while he wainscoted the bottom. 
Once it dries he will frame it with the special trim he made. 


 Michael installed the doors in the bedroom. The smaller one on the right leads to the walk-in closet while the door on the left leads to the hall. Michael still has to add the rosettes to each door top and I must paint it all. I will do that today.


I spotted a large, healthy coyote in the meadow yesterday. He was beautiful! I can't wait to hear him howl on dark starlit nights. Sorry the photo is so blurry. I took the photo through the window.


Thursday, November 8, 2012

Wainscoting And Counters

It's been non-stop here at Catch Meadow Cottage! We have been pushing so hard to get everything done before December 1st (my projected deadline). In fact, I am still hoping to have my first Thanksgiving meal in my new home if we can finish sooner.  Hmmm, that's exactly two weeks away! I'm not so sure we will make it but we sure are doing our best.

This week I got all the trim painted as well as the wainscoting that Michael installed. There is more wainscoting to go up in the kitchen but that will go up sometime this weekend. I also gave the walls a first coat of paint.

The following photo shows the hall leading from the living room to the bedroom. The window on the left is where the cellar stairs used to be. It is now an opening looking down to the new cellar stairway. It allows heat to flow and offers a nice open feeling in the house. I am thinking about building bookshelves on hinges for this window. That way if I wanted to close the window I could yet still have a useful function for the space when I do close it.

                                         Here is the Wainscoting in the hall before it was painted. 

 Here is the hall all painted. As you can see, Michael has started installing the pine flooring. 

                        Here is the wainscoting in the bathroom. Notice the vanity is now in.

The bathroom wainscoting is all painted now. I decided to paint the beams white in this room, however, I am going to repaint the walls because it just seems too dark for this small space. 

Here is the entryway with the bare wainscoting. 

And here is the entry painted.

Now, this is the most exciting part of the week. The counters were installed on Tuesday! 
I am so happy with the outcome. I really wanted Carrara Marble throughout the kitchen and bathroom but after discovering how high-maintenance and very tricky marble is to install, I felt a better choice would be Silestone. I chose a style which was created to look just like Carrara Marble but without all the hassles. Silestone is 97 percent quartz and 3 percent composite material. It is extremely durable and doesn't scratch, chip or stain. Best of all, it doesn't have to be sealed every 3-6 months like marble! It is an absolutely fabulous alternative to marble and the best part is, 
I got it on sale and saved lots of money! 

Now I have to paint the cupboards to match.

                    Because the countertop is mostly made of quartz, there are glittery, little speckles that 
                                                            reflect the sunlight so perfectly. 

                                It blends so beautifully with my new farm sink, don't you think?

I chose a different edge on the bathroom counter to add a little more elegance to the room.

 Michael is working on installing all the floors this week. He wants them all in by the end of today! We will then have to sand, stain and polyurethane them. I decided to go with pine floors because I love the old look of them. Michael suggested that it would look even older if he varied the widths of the boards and used cut nails like the old-timers did years ago. I agreed with him. 


And here is what I woke up to this morning! At least five inches of snow on November 8, 2012. 
This is the scene from my apartment balcony. Simply beautiful. 


Enjoy the day! 
And thanks for all your support and encouragement.